ILC NewsLine first published this article on September 1, 2011.
X-ray tomography gives subsurface view of accelerator cavities
The power of the CAT scan to find tumors or bone fractures has advanced medical science by bringing such ailments to X-ray light, foregoing the need to cut a body open for diagnosis. As particle accelerator research makes its own advances, scientists are exploiting the X-ray in similar ways.
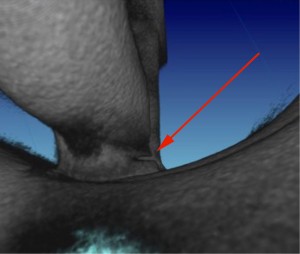
3-D X-ray computed tomographic image of a cracked higher-order mode coupler antenna. Image: North Star Imaging
Researchers at the US Department of Energy Fermi National Accelerator Laboratory have been using X-ray computed tomography (CT) to take their search for faults in accelerator cavities and associated structures beneath the surface. Penetrating X-rays can reveal performance-limiting cracks and holes that would otherwise go undetected.
“It’s been a really cool tool for us,” said Fermilab’s Elvin Harms. Unlike its most familiar application in the medical field, X-ray tomography isn’t used to to view a cavity’s innards – there’s nothing in a cavity but empty space. But flaws and other weakness can hide within a cavity’s walls or other places, such as cavity end groups, that are tough to access without breaking cavities apart.
The method of diagnosis of a cavity by X-rays is fundamentally the same as that of a patient in a CAT (computed axial tomography) scanner. It begins by placing the suspected-broken structure inside a radiation-safe X-ray cabinet, between the X-ray tube and a digital detector. The differences in material thickness and density attenuate the X-rays differently. The differences are detected and recorded, and a two-dimensional image is produced from the pattern.
Then the object is rotated half a degree and another image is produced. Once the full 360-degree series of images is acquired, a three-dimensional portrait is constructed from the two-dimensional images.
Fermilab scientists have been working with North Star Imaging, based just outside Minneapolis, US, to create high-resolution images of superconducting radiofrequency (SRF) niobium cavities. In addition to manufacturing X-ray imaging and CT systems and providing imaging services, the company develops software to create the 3-D reconstructions. The software allows its users to control the perspective, zoom, image contrast and value spectrum of the imaged object.
“Now you have really powerful software to be able to take those images, meld them into something you can look around and look through, take out the noise if you need to and really look for faults,” Harms said.
In one case, higher-order mode coupler antennae were suspected of causing multipacting that limited cavity performance. Researchers came at the problem from a number of angles, but they couldn’t positively ID the culprit, despite strong circumstantial evidence.
“It was very clear there was something not right,” Harms said. “You couldn’t see any fault, and we couldn’t get an optical viewing device in there.” The team also didn’t want to ruin the cavity by cutting it apart since it had been performing fairly well until the problem arose. “Well,” he said, “we didn’t have to.”
X-ray tomography revealed a micrometers-thin crack in the back leg of the antenna, one that, even if the team had been able to access it in its out-of-the-way location, wouldn’t have been visible.
Part of the challenge of imaging the cavities is the high density of niobium, which requires using the right X-ray energies and suitable filtration techniques to get clear images of the cavity shape and any faults that are buried in its walls.
“Whenever you have to image highly dense materials – platinum, molybdenum, niobium – you’re going to have challenges,” said North Star’s Wes Wren. “Any part for which you’ll ever need computed tomography is going to need a slightly different technique to create the best X-ray images for that specific part. Better X-ray images create better CT data sets.”
The technique you need isn’t always straightforward.
“The head of our inspection service lab has been doing this for 20-plus years, and our applications manager has been in the X-ray field for about 30 years,” Wren said. “They’ve used techniques that are counterintuitive to what the books say.” The methods for X-ray CT imaging, as with any scientific technique, improve by experiment.
That includes improvements in imaging the cavities’ interior surfaces. Because of the cavity’s particular geometry and the way the X-rays are reflected inside the cavity, images of the inside wall aren’t as crisp as those of the exterior surface. One idea researchers hope to explore is the placement of the X-ray gun inside the cavity, generating images from the inside out.
And, unlike a camera, it could also capture flaws that lie between the inner and outer surfaces.
“There’s power in this technique to see below the surface, if that’s considered important,” Harms said.
Most researchers who work on niobium cavities say it isn’t clear whether what lies beneath the inner surface of a cavity isimportant. The topmost 50 or so nanometers of a superconducting cavity’s inner wall are responsible for the electric fields that help accelerate a particle beam. What lies beyond those nanometers may or may not matter. Nevertheless, the mechanical integrity of subsurface structure could be important as, if nothing else, indicators of what companies are doing right and wrong with respect to manufacturing cavities.
“What you really want to do is prove that you’ve mastered the fabricating technology,” Harms said. “This might be another useful tool in the SRF game.”


